New Sprit Sail for my Skerry
Stitch and Glue Sailing Dinghy.

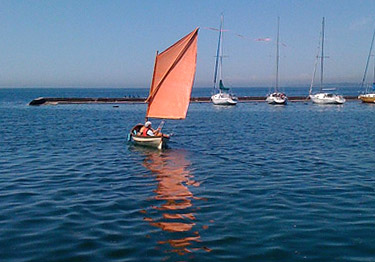
My orange polytarp sail is 2 years old and quite stretched out. It had been a good size and design and I did not want to improve too many things.
The main change I wanted was more shape to the inside of the sail. The orange sail had some shape in the form of curved outside seams but was pretty much flat in low wind, and I was hoping that the better shape would help. The polytarp has the advantage of actually stretching and thus having more shape than stiffer materials.
I also wanted to have a more permanent sail. This meant Dacron sailcloth rather than the useful but less permanent polytarp.
I had a half made balanced lug kit I had ordered from Sailrite. A few hours short of finishing I had decided against it. I really like the sprit and after having made the spars for the lug I did not like them. So I had the spars and the half finished sail just sitting in the unfinished side of my life!
My sprit is not all that different from the actual shape of the balanced lug. The sail had good shape and I decided to use my orange sail as a pattern and see if I could cut the kit sail and salvage the material.

I went to the park and stretched out my almost completed balanced lug. The orange polytarp fits quite well on it. Cutting it down will not modify the shaping much since I will mostly be cutting the high peak.
The peak will still be higher than the orange sail. This will mean that I have to extend the sprit by about a foot.Read how I lengthened the sprit here.
NOTE: in hindsight the higher peak was not a great success and I later cut down the sail to it's previous size. It was difficult to push the sprit to keep the peak up tight. I always seemed to develop creases in the sail.

I did not have to modify the shape of the balanced lug sail very much. I cut down the peak, but otherwise used all the corners which were nicely reinforced. I cut a very slight curve in the side that laces onto the mast to allow for the slight bending.
The sail is loose footed. The longer sprit is shown here and if you look at the tip you can see the extension. I'm experimenting with the set up.
I took out the boat and there was about 10 knots of wind. I had the small jib up and the rig was fabulous. I could let go of the tiller and the boat just tracked perfectly.
Adding a small jib improved the handling and efficiency of the sail. It pointed upwind better too. There was a problem though, it adds another level of complexity to the rig and dealing with the jib made sailing the Skerry more complicated. There were 3 extra lines to get tangled up too. When I tack the sail sometimes gets snagged on the sprit end that sticks out towards the front. I keep a boat hook to push it off when this happens
One advantage of the jib is that I can heave to and actually "park the boat". It sits very quietly and drifts slowly.
I never noticed that my rudder had not been lowered. It was still in the up position and I never missed it since the boat moved so easily. It did feel a bit sluggish in a tack though!
I kept the reefing spot to shorten the sail but since I rarely use it it is not likely to be all that useful.
My Nick is insisting that I need a new jib because he feel orange simply does not go with red.
UPDATE: I eventually cut the sail to lower the peak. I could not get it to set properly, or rather to stay set. The ideal position of the sprit is bisecting the peak and I was too far out to manage this without a lot of adjusting. After that adjustment, the sail is really good and I'm very happy with it. I've learned to handle the slightly larger sail area and with the jib there is almost never lea helm.
I try to be accurate and check my information, but mistakes happen.
email me if you find mistakes, I'll fix them and we'll all benefit: ChristineMy sailmaking experiments.
Nautical Terms relating to Sails
My Sprit sail page. The sprit sail is one of the most efficient rig of ALL including the Bermudian.
Some sail related products and books
Oner of my favourite books on sails:
Medium weight Grommets are perfect for experimental sails.
When you make a good sail then you want to use heavy duty grommets, these guys have lots of sizes available:
I tested my new Spoon Oars, with a Video
Teach Yourself to Sail
Ten Essential Knots
Marine Plywood Article.
Making a handmade carbon fiber mast for your sailing dinghy
DIY Launching Dolly for small boats
Making a birdsmouth mast
My sailmaking experiments
Carbon Fiber Characteristics
My Rowboat article
My Dory Page
Making a Puddle Duck Racer
Launching a stitch and glue Apple Pie Pram that I built as a tender for my Tanzer. The plans were free
Nautical Terms explained Boat building has its own language. Here are the most common boat hull terms explained.
Small Print
This information is for general knowledge. it's not intended to replace plans. If you are not comfortable using powertools get help cutting and drilling.