
Stanley 12-920 6-1/4-Inch Contractor Grade Block Plane
King Japanese Grit 1000/6000 Combination Sharpening Stone KW-65 and King 8000 Nagura Stone : Bundle - 2 Items
Craftsman 7A 3X21 BELT SANDER 00939595000P HIGH QUALITY HEAVY DUTY WITH FREE SHIPPING
Toledo Community Boathouse has an article on joining wood including Dynamite Payson's method of butt joint.
Links to Boat Plans, many are for Stitch and Glue building. Many plans are free. Jordan Boats above offers plans among others.
Craftsmanspace has lots of diagrams of variation on the scarf joint.
Boatbuilder.org Stitch and glue construction
Stitch and Glue method from GlenL They also have boat plans
Dories
DIY Wood Boat.com Stitch and glue techniques
MAS Epoxy
Teach Yourself to Sail
Ten Essential Knots
Marine Plywood Article.
Making a handmade carbon fiber mast for your sailing dinghy
DIY Launching Dolly for small boats
Making a birdsmouth mast
My sailmaking experiments
Carbon Fiber Characteristics
Making a Puddle Duck Racer
Launching a stitch and glue Apple Pie Pram that I built as a tender for my Tanzer. The plans were free
Nautical Terms explained Boat building has its own language. Here are the most common boat hull terms explained.
Small Print
This information is for general knowledge. It's not intended to replace plans or proper instructions. If you are not comfortable using power tools get help cutting and drilling. Be safe and have fun.
Joining Wood and Plywood
for Boatbuilding
Boatbuilders have had to adapt their boatbuilding methods to use materials that were available locally. It is rare to get long flawless planks and for this reason many methods of joining wood to make it longer were developed.
Traditional Methods of Scarfing
Scarfing is a common technique to join 2 pieces of wood into one longer plank. There are many examples of scarf joints in Viking boats and the technique persists today in traditional faerings and Scandinavian boats. In practice it is often found in any traditional lapstrake (clinker) built boat.
The goal of scarfing a plank is to make a strong joint that bends in a similar way to the rest of the board. If the joint is too stiff then the curve of the plank will be different where the joint is located. The ends of the planks to be joined need to be tapered and overlapped. The overlap is often 8 to 10 times the thickness of the board to insure good strength and if glue is used, good adhesion. Pitch or tar mixtures were often used in traditional boatbuilding, between layers to help make the joint watertight and help keep it together.

The scarf was then fastened using clinched nails or rivets. A clinched nail would be driven from the outside to the inside and a thick piece of metal used to turn back the head of the nail into the wood thus clinching it. The metal piece is called a dolly. Vikings sometimes used iron nails but copper is often used now.
Scarf joints are also fastened with rivets. In that case the rivet is driven through the 2 layers to be joined, (it is sometimes necessary to drill a pilot hole) and a small washer is put on the end. The rivet is then cut slightly protruding and hammered so that the end thickens and becomes too thick to allow the washer to slip off. The head is rounded and the rivet is then permanently set.
Plywood is now the choice of many boat builders and it comes mostly in 8 feet panels. To get long planks, plywood is scarfed. In this case epoxy is used to fasten the 2 pieces together. Almost all stitch and glue projects will involve some scarfing.
Cutting the Taper for a Scarf Joint

When I built my Skerry this was one of the steps that caused me the most anxiety. I had no confidence to be able to accurately cut the plywood. In practice there are many ways of cutting the slope and they all work out.
First step is to mark on both planks where the taper ends. Then the 2 pieces of wood that are to be joined are clamped together such that the bottom plank is aligned to the end of the table and the top plank is aligned on the mark you made on the bottom plank. You now know to cut from the mark you made on the top plank to the bottom edge of the bottom plank. There are many methods to do this.
My first effort was to build a jig and use my router. It worked but the router tended to tear out the very thin edge of the plywood at the very end of the bottom plank.
My second effort was to try my belt sander. This worked but I found it tricky to get a perfect slope, it tended to want to make a slightly curved surface.

Finally the best solution was the one I had the least confidence in. Using a block plane just carefully cut a slope in the plywood. A bit of sanding at the very end makes a perfect surface. It is easy and fast. The plywood layers form guidelines that are straight when the cut is accurate, how cool is that!
The plane has to be SHARP. If you make a less than perfect edge, cut your wood so that slightly imperfect side faces out on the hull, where you will likely paint and the inside joint that shows if you finish bright, is good.
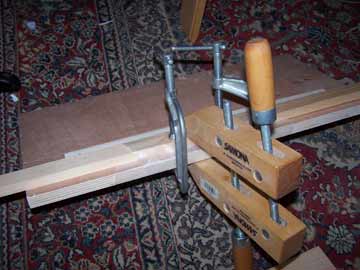
It's a good idea before you glue the joint, to put some packing tape to control the epoxy squeeze out. I glued on wax paper and gently clamped the joint. Don't clamp too tight because you will squeeze out too much epoxy and weaken your joint. Often the epoxy is thickened with silica which fills any gap well.

Chesapeake Light Craft use puzzle joints in their boat and kayak kits. They make joining plywood very easy and accurate. In my eyes it looks a little odd, but it is solid and easy to do.
If the wood to be joined has a similar colour then the joint is not very noticeable.
I made my own puzzle joint if you are interested. It worked very well.

Dynamite Payson's Butt Joint
Dynamite Payson developed a method that is proving to be quite strong and easy to do.
Instead of cutting a taper, the plywood is butted together, a layer of wood sanded off top and bottom on either side of the joint and a piece of fiberglass is added to the top and bottom of the joint.
The thickness of wood removed from the plywood is made up by the fiberglass and resin so the finished plank is flat.
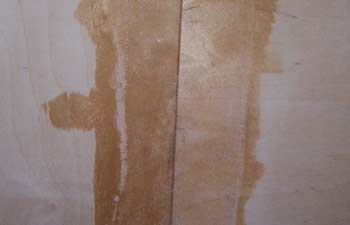
I've tried this method and found it very good. The joint I made was stronger than the wood and the wood broke before the joint failed in my test piece. The plywood was slightly more rigid at the joint. This was not a problem in the project I was doing.
Duckworks Magazine article on Dynamite Payson's method of joining plywood is well worth a look.
When I made my Bird mouth spars, the wood I had was quite short. I scarfed the various short pieces to make long planks to glue up for the mast and sprit. It worked very well and as a bonus did not show because when the mast was rounded the joint just looked like a curved wood grain pattern.
I try to be accurate and check my information, but mistakes happen.
email me if you find mistakes, I'll fix them and we'll all benefit: Christine