
Steps in Building a SCAMP sailboat
Links to all my scamp building pages.
There was a long delay between starting the topside and finishing. I got Covid 19.
Although I got a somewhat mild version I still suffer from really low energy level after 10 months. I'm only just starting to feel mildly capable of working on the boat.
I continue working on the topside
Back Cowling

Since I was not sure how to deal with the connection of the back cowling I had left it overhanging.
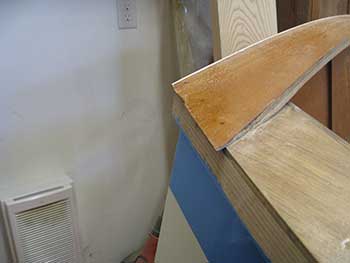
I eventually decided to cut it flush with the edge and round it.
This will allow me to place the outside gunnel under it. If I need to replace the outside gunnel, I can do so without disturbing the back cowling.

Here is the back cowling after rounding. Before making the hole I had filled the underside of the back cowling with wood and thickened epoxy to fill the gap between the cowling and the back of the deck.
I did not fuss too much with the bushing, I made a hole and glued it in with thickened epoxy. This hole will be used to guide a line on for the traveler. I bought it from a farm supply house. It's a bronze bushing.
Sanding, ad nauseum.


The next couple of months were spent making sure all the fillets, on the various seams were good and smooth. There was a tremendous amount of sanding, filling with filler mixture, (mostly phenolic filler) and prepping to paint.

Phenolic filler comes as a red sticky powder that is mixed with epoxy. It takes a lot of powder to thicken epoxy so start with a small amount of epoxy and mix till it's thick enough to be a useful filler. It's moderately easy to sand.
I ran out of enthusiasm when it came to sanding under the deck. It was hard to reach. I just made sure the fillets were good and there were no sharp edges. I used a hand mirror to see if there were any obvious problems.
At this point I checked that I had plywood backing plates in place in the spots where I was going to put mooring cleats. I have 3 per side planned but I'm not sure it really needs 3. Probably 2 will work just as well for a 12 foot boat!
I used my random orbital sander for the big areas and my multi tool, (mine is dremmel) for the harder to reach area. Not much fun but it's done now.


The wooden ledge that will support the removable seat used for rowing was installed. I've cut a piece of 3/4 plywood for the seat.

Sanding the inside of the centreboard was difficult. I made a little padded stick to at least rough up the epoxy. There is at least 3 layers of epoxy on the inside surface and I'll try to put a coat of paint over that.

I cut, shaped, and glued a piece of wood to help support various bits of rigging hardware. Cleats mostly. I also prepared some plywood squares to support a downhaul pulley that will be placed beside the mast. I'm not sure of the exact position so I'll wait till I start the rigging to finalize these bits.
I finally start painting the topside
After a massive shop clean-up I get ready to start painting.


I put the first coat of blue paint on the top and side of cabin and on top of back cowling. It covers really well, Brightside paint. All the flaws show up of course with a coat of really shiny paint.


It took a while to get the first coat of cream paint over the interior. It looked pretty rough. After letting it set for a few days I sanded it and put on a second coat. The cream paint is a lot less dense than the blue.


I prepared a modified paintbrush so I could get to the tight spot under the deck.
After 3 coats, the interior is painted. I went around with my mirror and touched up the spots I had missed under the deck.
 The outside deck is painted and the cabin is ready for it's second coat. Once that is done I can prepare the outside gunnels.


I used a non-skid powder on the floor. It feels a bit like sandpaper now.
emails: Christine
If you decide to build a boat be careful. These tools can be dangerous. If you don't know how to safely handle something find out.
This web site reflects my personal ideas and doesn't represent anyone else's point of view. I don't claim to be an expert in anything, just someone muddling along.
I pay for maintaining this website by having links to Amazon.com. I choose the ads to be relevant to the content. Mostly stuff that I buy myself or lust after. If you buy after clicking one of the links I get a small fee.
Carbide blade scraper is one of the most useful finishing tool I own.

Warner 804 Tool 2-Inch Carbide 100X Scraper with Knob by Warner Manufacturing
Brightside, polyurethane comes in a whole range of colours. I've used it and really like it.
Oscillating multi tool is also very useful for sanding in corners and in hard to reach areas.

Rockwell RK5151K 4.2 Amp Sonicrafter F80 Oscillating Multi-Tool with Duotech Oscillation Angle Technology. 12 Piece Kit includes 10 Accessories, Carrying Bag, and Oscillating Tool

Fandeli 36014 220 Grit Wood Sandpaper Sheets, 9" x 11", 25-Sheet
Inexpensive rounding bit kit gets you started.

Yakamoz 6Pcs 1/2 Inch Shank Round-Over Router Bits Corner Rounding Edge-forming Roundover Beading Router Bit Set
Freud rounding bits.

Freud 5 Piece Round Over/Beading Bit Set (1/2" Shank) (89-152)

LifeStraw Personal Water Filter for Hiking, Camping, Travel, and Emergency Preparedness

Stanley Classic Vacuum Bottle 1.1QT Hammertone Green