
Steps in Building a SCAMP sailboat
Links to all my scamp building pages.
The Cockpit Coaming which act as Backrests and Cockpit Fence
There is probably a very salty name for this but I don't know it. I'll go for coaming. This is a fence and splash guard, that runs on the inside of the side decks and acts as back rest for the seats. It would also add stiffness to the structure.


I spent some time sanding and smoothing out under the decks. I also added some fillets and a final coat of epoxy. Not much to show. Not my favourite job, but eventually the epoxy was smooth enough for me. Since this will not show, I'm only going to finish enough so that it's waterproof, well glued in and does not snag anything that might get put in there.
I'm getting good use of the Dremel Sander. The triangular foot can get in corners and in narrow areas. The papers are quite expensive and I try to use it sparingly. If I could find large sheets of velcro paper I could cut out the triangles. I'll ask Mr. Amazon if there is any out there.

I also glued in some plywood reinforcements under the spots where I plan to screw on some mooring cleats. This was epoxied in, sanded, and filleted.
I also spent time smoothing out the drainage holes cut in the bulkhead that allow water to move and not pool against the bulkheads.
Fitting the pieces.

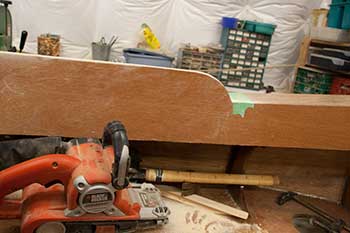
I did a final fitting before putting glue on to check that the coaming would go in with no surprises. After a little tweaking it went in.
The piece is stiff and it's tricky to muscle it in place. It slots in between the cuddy side and the carlings that support the deck. It follows the curve of the deck. I'd made the gap just a little too narrow and had to chisel off a layer of ply from the fence. Not difficult when you have sharp just sharpened chisels. --- self satisfied grin goes here.

Eventually I was satisfied it would glue up cleanly so I put some glue down and clamped the coaming in position. We have had very cold weather and the shop is not warm so I had extra working time with the epoxy. It's not complicated but because the plywood needs to bend it was a bit tricky to get it in place and clamp it.
After cleaning up any squeezed out glue and making sure everything was lined up I was able to check everything again and left the epoxy to set. The shop was warming up and I put an extra log on the fire.

Where the fence meets the side of the cuddy, there is a V shaped space that gets a piece of plywood to close in the fence. I cut and fitted this gusset but did not glue it in quite yet. I wanted to have the piece to make sure the angle of the starboard side was the same as the just done port fence.
I spent some time checking the fit of the starboard fence. No surprise there. I went on to glue the second side. There was a slight gap between the coaming and the deck because I had sanded the supporting carling and had rounded the profile very slightly. A little extra epoxy glue fixed that. A quick clean and making sure that the angle of the fence was the same as the other side, I left everything to set.
I'm not sure why this step had worried me but I was relieved that it had gone well. The manual instructions were just a little vague and the photos were not as helpful as I would have liked.
The next step is to fit and glue in the little triangular gusset pieces and put a strip of wood on the outside edge of the coaming.
Both the deck and the coaming have no pencil marks and could be left natural colour. I'm not planning to have a lot of wood showing. I'll decide later. For some reason, varnished wood is a lot more maintenance than painted wood. It's much prettier though.


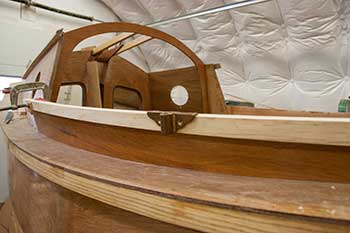
Both sides glued in and ready for the coaming cap. A strip of wood that gets attached to the edge to strengthen the coaming and get rid of the sharp edge.


With the coaming in place I was able to make a pattern and cut the cuddy side doubler. It reinforces the opening and covers the cuddy side and coaming connection. I noticed that the 2 sides were not absolutely the same. I think this is a result of the bulkhead plywood being slightly warped.
It reinforces the opening of the cuddy.

I glued the doublers and once set, I was able to even out and sand the 2 glued edges. I wanted to do this before closing in the side in case it made it more difficult to access.


I dug up my steaming apparatus. It's a large coffee can with a hole hear the top. There is an insulated curtain rod/pipe that runs to a aluminium dryer vent pipe. I heat the water on a portable induction hotplate. I had a better lid but it rusted so I used a metal plate with bricks on top. It worked well enough. I insulated the pipe with whatever sweater, shirt, scarf and cardboard I had around. The wood is only 5 feet long so it's not a long set up.

I left the wood in the steamer for over an hour. I worked fast to clamp each piece onto the coaming. I left it on for a couple of days and it seemed to work very well.
I'm using ash. There is a great abundance of it right now because all our beautiful ash trees are being decimated by the Chinese Emerald Ash Borer. This wood has been kiln dried in a local mill. It's lovely to work with. I made my gunwales with it as well.


I made a cardboard pattern to fit the gusset and to my everlasting amazement, both sides were exactly the same. I marked the patterns on the plywood, cut it on the band saw and spent some time fitting it into the space.


I cut some bevels on the sides and once I was happy the pieces were fitting well, I glued them in. That proved to be a comedy of errors. I had a huge amount of trouble clamping the pieces in. Eventually I won but it was a good fight. When the epoxy set I was able to round the edge and put small fillets to allow the glass to fit on better. The glass went on without any trouble. It set overnight.


After cleaning up the excess glass cloth and scraping the edges to flatten them I started fitting the coaming cap. There is a small piece to fit along the gusset and the long piece which I had steamed, bent, and clamped. When I took the piece off, quite a lot of it had stuck to the epoxy. I guess the wood was hot enough to slightly soften the set epoxy and under pressure stuck to it. It came off with no damage but the epoxy definitely softened.
It took me a long time to fit the small piece because it's hard to measure and copy the compound angles. Eventually it was good enough. After sanding and roughing up the edges of the coaming and wooden cap, I glued and clamped it in position, cleaned up the squeezed out epoxy and checked that it was in position.
The wood had enough curve because of the steaming, that I did not have any trouble clamping it in place. There was just enough epoxy that squeezed out to show that it was well glued. It will set overnight and I'll finish putting in the small piece.
I'm debating weather I will put some screws in the wood. I'm not completely happy using just glue when the wood is under tension. I'll keep a few clamps on the wood till I have to decide.


I spent some time fitting the smaller pieces at the gusset and very end of the cap. After a quick sand and dust I glued the small pieces front and back.
The 2 sides are now glued and ready to be cleaned up, shaped and sanded. I also have to decide where and how and where to attach the oar locks before I modify the cap.


I like this sort of job. I spent a pleasant few hours listening to music and trimming the coaming caps. (Did you know that Bob Marley actually recorded "I shot the Sheriff" in French?) The front and back were oversize so I used the Japanese saw to get most of it off.
I used the belt sander to trim the coaming flush. I put a high grit belt on but even so it is very aggressive and I had to be quite careful not to chew up more than I wanted.
This little Black and Decker belt sander has served me much better than I expected. I got it on sale a million years ago and it has lasted beyond expectation. It has a narrow front that can get in quite small spaces and the handle can be clamped at different angles to allow the sander to be used up side down.
The edge is now even and clean but I have not rounded the edges yet. I'll wait till I've decided where and how to attach the Oar sockets.
After putting a board across the benches and pretend rowing I've found a spot that seems to work. I don't think the position is critical. It will be positioned as far forward as I can put it without bumping my head when I row. It looks like it would put my weight at the balance point, or slightly behind it.
I'll add some re-enforcements in that spot.


The coaming cap is now smooth. The back is mostly done except for some rounding and sanding on the underside. The front angle is just a bit odd. It comes from the actual angle of the gusset piece. I photographed it at the angle where the bottom looks the worst. I might have to add a small piece of wood to smooth out the flow of the cap and give me the proverbial fair curve.


The coamings are essentially done now. I will use the router to round the profile once I've decided how to install the rowing hardware. I still have to add a whole lot of very visible (so quite scary) fillets.
[HOME]emails: Christine
If you decide to build a boat be careful. These tools can be dangerous. If you don't know how to safely handle something find out. There are lots of forums out there.
This web site reflects my personal ideas and doesn't represent anyone else's point of view. I don't claim to be an expert in anything, just someone muddling along.
I pay for maintaining this website by having links to Amazon.com. I choose the ads to be relevant to the content. Mostly stuff that I buy myself or lust after. If you buy after clicking one of the links I get a small fee.
I live in a mostly rural area and suppliers of boatbuilding stuff are pretty thin on the ground. Amazon has proved to be a reliable and well priced resource.
SCAMP envy/Lust This is a thread in the Wooden Boat Forum.DEWALT DW3742C 14-Piece T-Shank Jig Saw Blade Set with Case

System Three 3145S16 White Glass Microspheres, 1 quart Tub

O'Keeffe's Working Hands Hand Cream, 3.4 oz., Jar

Gyokucho 770-3600 Razor Ryoba Saw with Blade

Bessey LM2.004 LM General Purpose Clamp

Garboard Drain and Plug from Sea Dog

I often buy books just for the fun of reading and dreaming about my next boat build. Building the Greenland Kayak : A Manual for Its Contruction and Use

Devlin's Boatbuilding: How to Build Any Boat the Stitch-and-Glue Way

Building Classic Small Craft : Complete Plans and Instructions for 47 Boats

SeaSense Galvanized Claw Anchor, 22-Pound

Varnish,Spar,Oil Satin,Qt

APEMAN Action Camera 4K Wi-Fi Waterproof Underwater Camera Ultra Full HD Sport Cam 30M Diving with 2" LCD 170°Wide-angle/2.4G Remote Control/2 Rechargeable Batteries/20 Accessories Kits

My next shop project will be to get some dust collection system. I use a shop vac but it's annoying having to wheel it around and set it up every time. In the meantime I want one of these.
The Dust Deputy

If you decide to build a boat be careful. Some of the tools and materials can hurt you. I offer this page for entertainment and don't want to imply that my method or ideas are necessarily the best way to do things. It just worked for me.