I made a watercolour table easel
I wanted to try an easel so I put one together. It is a great success and I use it all the time. The angle can be adjusted or the image can be completely flat.
It was fiddly to get the angles right but once that was sorted it is a simple project. It would be easy to adapt this to fit on top of a paintbox or to modify it to become an outside easel.
Table Easel for Watercolour
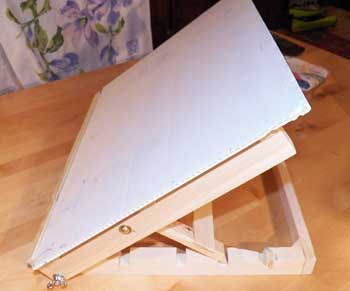
My board is 12x16 since I paint with a quarter sheet or less it is a perfect size.
I use a piece of corrugated plastic as a backing board for the paintings. It's light, does not warp and does not get wet.
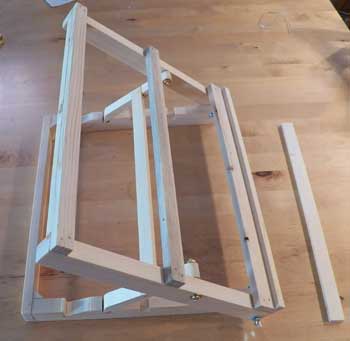
I made the easel from junk wood. An old 2x4 cut up and various bits and pieces of spruce and pine. Since I have a table saw it is not hard to cut the wood but this could have been made out of 1x2 strips and a little cutting with a hand saw.
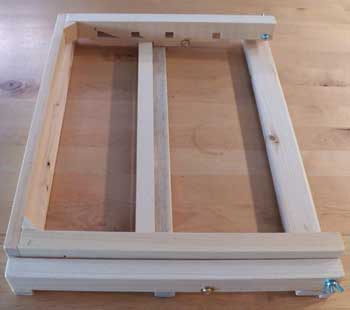
It folds nice and flat and can fit in my painting bag.
This is a view from the bottom.
Note the notches that adjust the angle of the easel. The back one, on the left, has its side cut at an angle to allow the support to fit in. I had to gradually cut it until it worked. The front notch is too far forward and can't be used. I could cut another notch further back but I find that I don't care if I have a really steep angle so I won't bother.
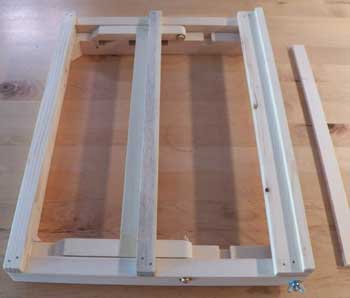
Top view of the folded easel. The little stick on the right is used as a spacer if I want to change the angle to be steeper than the little notches allow.
At first I tied the easel shut, but then I remembered that the thumb screw could be tightened in the closed position. This keeps the easel closed.
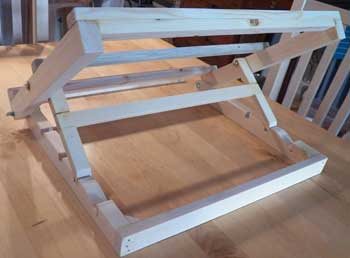
Back view of the easel with the little support in the second notch.
The easel is made of 3 parts. First the top frame is made. It has 2 side supports and 3 cross pieces. The bottom crosspiece has a rabbet that holds the drawing board.
The next part is the bottom frame. It has 3 sides only and has notches to adjust the angle. I put little triangles to support the back angle. It is made to fit loosely inside the top frame.
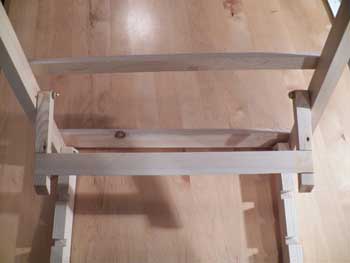
The third part is the support that adjusts the angle of the easel. It is the same width as the bottom frame.
Finding the exact position to place the support was the hardest part. I had to fiddle with it to get it right. I think I would use cardboard to figure it out if I had to do it again.
I glued everything with 5 minute epoxy and added little nails to keep it in place until it set. The pivot between the top and bottom has a butterfly nut that allows the easel to be tightened. The pivot between the support and front has only a screw and nut. There are washers everywhere to help space the inside and outside parts some.
Everything has been sanded smooth and has a coat of clear varnish. Even though I made 4 notches only 3 are usable. The front one is too far forward. So next easel I will delete the front notch. I had to adjust the back notch and cut out some wood so the little support to get in the notch. See the higher pictures where it is more obvious.
The varnish has added some stiffness to the easel. The wood is really not very strong or hard. I used water base polyurethane. There are a couple of coats. If I was going to make this again I might use hardwood. This was intended as a cheap experiment. It works very well and I use it a lot.
Below are links to the record of a series of lessons I took. Obviously the paintings are not great, I occasionally rise to good but not much more. They are interesting because they show the progression of skills. I start as a not particularly skilful nor talented beginner and end up as a more skilful but not particularly talented intermediate student. The journey was great fun.
[HOME]
Email Christine
I often wonder if there is a magic number of paintings a student has to make and then gets it?
When I was in design school something amazing happened in third year. We were drawing several hours everyday and one day a connection happened in my brain.
It was a link between the drawing and the conceptual design. After 3 years I was thinking through the sketches and drawings.
My instructors immediately saw that I had made the connection. I guess it had happened to them too. For me it was very dramatic. One week I did not have this insight and the next my outlook and skill had been transformed.
I wonder if this happens with watercolour. I am still stumbling on the technical side.
This is very exciting.
