
How to Make Soap
An Introduction to Soapmaking
My old Grammy DeMerchant lived in a small New Brunswick village and used home made soap to wash her clothes. Cooking fat was collected and when there was enough she would make up a batch of soap using Gilletts lye. She used an old enamel pot, and she worked outside on a covered porch.
This made a semi hard grey-beige soap that was added into the copper kettle along with the laundry water which came from the rain barrel. In this she boiled her laundry on the same old stove she made her soap on.
She would never have dreamed of using her coarse laundry soap on her skin but the process she used has not changed much.
What is soap
When a strong alkali reacts with fat, a chemical reaction called saponification occurs. This reaction results in soap being made along with glycerin as a by-product.
Craft soapmakers usually choose sodium hydroxide as their alkali. Occasionally a soft soap recipe calls for potassium based alkali.
True soap is always made of fat and lye. During the saponification process the raw lye and fat get used up and no lye or fat remain. In reality most soapmakers add a small proportion of extra fat to the recipe in order to use up any lye that is not reacted and to make the soap less drying.
Before the days of bought Lye, ashes were collected and water passed through them. The resulting liquid was used to make soap. This was mainly potassium rather than sodium based alkali and made a softer soap, but that did not matter for laundry.
My Soap Making Process
I made some soap for a fund raising sale for the Annex Cat Rescue. I also make catnip filled toys, but I was bored and wanted to try something new. Here is how I did it.
Years before I had made soap. Once when I got some mink fat from a farmer. Another time when I tried with an all vegetable recipe. Both experiment were successful but a long time back and before the days of stick blenders. These make mixing the soap and lye much faster and result in a much faster soap making process.
The Ingredients
In theory it's very simple, oil/fat, lye and a bit of water. That's all. In practice different fats bring different characteristics and it is good to mix different fats to benefit from better sudsing, harder soap, less harsh feel etc.
There are countless recipes that offer different soap qualities. I wanted to make an all vegetable soap. They tend to be softer than soaps that contains tallow and similar animal fats. Apparently it's the glycerine that keeps it softer. Glycerine is removed by commercial soapmakers and sold separately. It is retained in home made soap and adds gentleness to the soap.
I have now made about 10 batches and all the recipes have been good. As long as your proportions of oil to lye is correct you have a good chance of ending up with soap.
The most common fats used are Olive oil, Coconut oil, Palm oil, Sunflower/Canola/Soybean oil. Vegetable shortening is also commonly listed. Many other delicious fats can be added. In particular special oils can be added after the soft trace, when most of the reaction is complete. This allows the full character of the added oil to shine through. I've tried almond and walnut oil, coco butter, and castor oil.
Colour and flavour can be added but the lye tends to degrade most scents and colours and they have to be added at the end of the process when most of the lye is used up. Usually at trace just before pouring into the mold for cold process and just after cooking when the soap has had a chance to cool, in the hot process.
I have used essential oils bought from health food stores to add perfume scent to the soap. I've had good success with lavender, mint and cinnamon oils. Mostly I have not flavoured my soaps because I'm sensitive to extra perfume.
Some materials colour soap naturally. I have used milk and honey which turn the soap darker. I've also used cinnamon and paprika which make a reddish brown. I've read that turmeric and cumin also add colour. Soap supply stores sell special colouring but so far I've avoided them. I've also read that crayola can be used. I tried a small amount of a green crayon and it does work to colour. It is listed as safe for kids so I don't suppose it's too bad.
Lye or sodium hydroxide is available but not widely. In Toronto, I get my lye from a Home Hardware called Bastone which is just a hole in the wall hardware on Dufferin St. south of Dupont St. I've heard that Home Depot and Lowe sometimes carry it in the States as do various specialty soap and home made cosmetic shops. There are several online suppliers but there are restrictions in shipping it as it is a dangerous material. Lye used to be in drain cleaners but this is not always the case. Check the label and make sure. Also drain cleaners sometimes have little metal shavings to help unclog drains. Do not use this. I would start by checking the big boxes and then asking the smaller real hardware stores.
Lye is nasty stuff until it has reacted. It is corrosive and will burn badly, also it can do very bad things if eaten. BE CAREFUL
Tools used in soap making
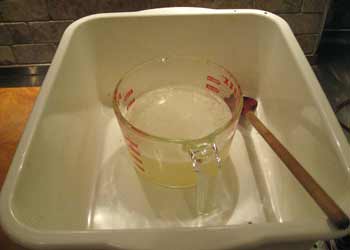
- I use 2 pyrex measuring cups. One for lye and a larger one for fats. A small bowl large enough to hold the lye.
- Goggles and rubber gloves are a must. An apron is also useful.
- I used a silicone spatula, a stainless steel and wooden spoons.
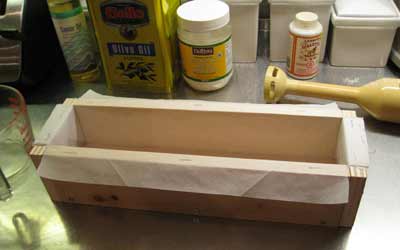
- A stick blender is almost essential, you can see it peeking from behind the mould
- a mould of some kind. I made one from wood boards that can be screwed and unscrewed.
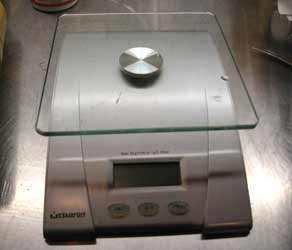
- You must have an accurate scale that measures tenths of ounces.
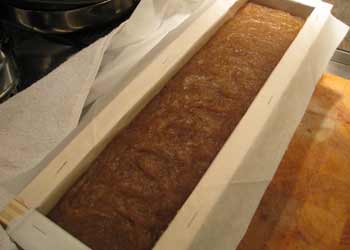
- Plastic film or parchment paper. Here I've lined my mould with parchment paper.
- A safe place to work that is well vented such as a stove vent or outside table.
- A thermometer is useful but not essential

The reason for the venting, goggles and gloves is that lye is very corrosive and will burn you badly if it gets on you. Keep kids and pets away. This is not a project for children. I work on my stove under the vent.
The Procedure, Finally we Make Soap
This is the instructions for cold process soap.
- Set up your mold and line it with plastic or parchment paper. Put on your goggles and gloves.
- Carefully measure your lye and put it in a small bowl. I put the bowl on my electronic scale and turn it on. This causes it to go to zero. I add the lye slowly into the little bowl until the right amount is measured. I use a stainless steel spoon to dish it out of my lye container.
- Measure your water in the smaller of the pyrex measuring cups. Use cold water or add ice to the water making sure you include the weight of the ice in your measure of water
- Working in a well ventilated space slowly pour the lye into the water stirring with a stainless steel spoon. It stained my wooden spoon the first time I used it. NEVER add water to lye. This will cause the lye to heat up and misbehave. It is dangerous. As you pour the lye into the cold water the water will heat up.
- Stir the lye till the solution is clear and then let it sit until it cools down some. I'm mixing in a wash basin in case the measuring cup breaks or I spill something.
- While your lye is cooling measure the fats you are using. Most recipes are weight recipes so you need to use your scale.
- Some of the fats will probably be solid, coconut and palm oil usually are solid at room temperature as is vegetable shortening. You will need to carefully heat them till they are liquid. I use the microwave.
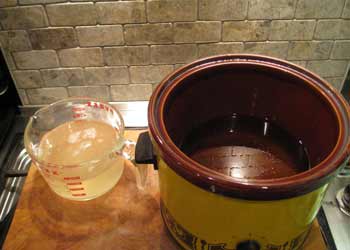
- Put your fats in a stainless steel pot, or pyrex, or enameled pot. You can use a slow cooker if you plan to cook the soap later for hot process.
- It is recommended that the fat and the lye be quite close in temperature and about 100 degrees Fahrenheit. If you are using a stick blender (and you should really try to get one), the temperature is less critical. Just don't use very hot or cold oil and lye.
- Slowly pour your lye solution into the fat. Don't splash but gently mix with your spoon or silicone spatula. The solution will start turning milky right away.
- Rinse your lye containers and spoons and tidy any bits that have fallen or splashed.
- Using your stick blender, start blending the fat/lye mixture. Use a speed that you can control easily, with no splatter. You pot should be the right size to allow your blender to be completely immersed in the solution. You don't want to whip it. Just quietly blend. If you are not using a stick blender add your lye very slowly and mix with your spoon
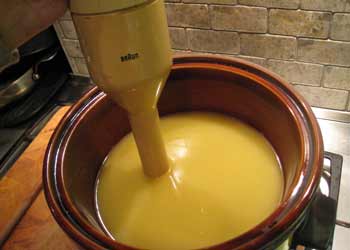
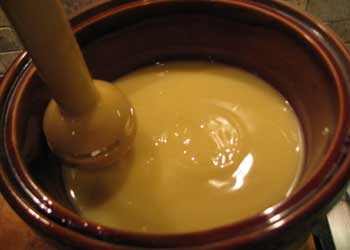
- Pulse your blender on and off and mix the soap around. After a minute or so the mixture will start thickening. When it is thick enough that when you take out your blender and let it drip on the mixture the drips stay on top, you have reached the stage called SOFT TRACE blend a bit more.
- When you have a good trace pour your soap into your mould. Tap it a few times to get rid of bubbles. You still have to be careful because all the lye is not used up yet and the soap can be quite corrosive.
- If you are mixing by hand it will take much longer for you to reach the soft trace stage. My first manual soap making project took 3 hours of mixing and keeping the soap warm. It will eventually come but it's much slower. All vegetable soap is slower than part animal fats.
- If you are using scent or colour then it is added at this point. It is also the time to add any extra oil you want to add to superfat your soap and make it more moisturizing.
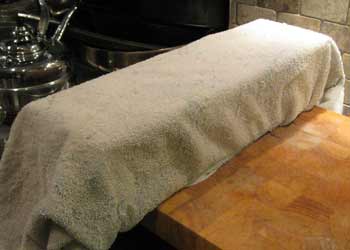
- Cover the mould with plastic wrap and wrap everything in a towel and leave in a warm spot for a day. My oven has a proofing temperature used to rise bread. I used this setting for a few hours. During that period the soap will continue reacting and will go to a jelly like consistency. If you carefully peek and see a disturbing gloppy goop in your mould all is well.
- Next day, check your soap. It should have hardened some. If it's hard enough, take it out of the mould and cut it in bars. If it's really soft still, let it sit in a warm place some more.
- Once cut, your soap needs to sit for a few weeks. 3-6 weeks depending on the type of soap. The really soft soaps take longer.
Hot Process Soap
Hot process soap allows you to use your soap much sooner. The gelling process is much quicker with the extra heat. After the cooking the saponification is essentially complete. It turns out harder as soon as it is cooled. There is not much difference in the finished product except that hot process usually has a rough top. It is almost impossible to smooth the soap as it is placed in the mould. It can also have little specks of hardened soap unevenly placed in the bar. Some soapmakers speak of putting a sheet of plastic on the top and weighing it with a board to smooth the top. I have not tried this but I think it would help.
if you prefer to do a hot process soap this is what you do. You will need a slow cooker. Instead of using a pot you make your soap in the slow cooker but keep it off until the soft trace exactly as above.
- After getting the soft trace stage use your spatula to make sure there is nothing on the sides of the slow cooker, then put the cover on and turn it on low setting.
- Don't mix it or do anything to it after it has started heating.
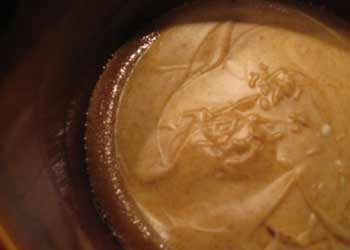
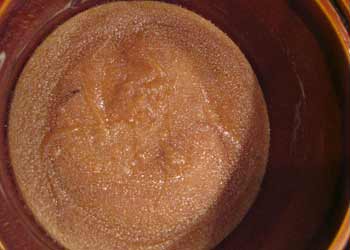
- Peek occasionally and you will see a ring of jelly like translucent goop gradually form on the outside. The photo on the left shows this.
- When the whole batch is translucent turn off the cooker and let the soap cool. When it is comfortable to touch but not cold, mix in the scent or colour dissolved in a bit of fat. Now is also the time to add extra fat if you want.
- Work quickly to mix this together and spoon the soap into your mold. Tap your mold as you fill it to get rid of bubbles. If it's too cold it will start to solidify, if it's too hot and soft it will burn off any scent you add.
- Let it cool overnight and cut it. It will be harder than cold process soap and can be used immediately. It benefits from sitting and drying out for a few days though. On the right you can see a hot process batch with it's rough top.
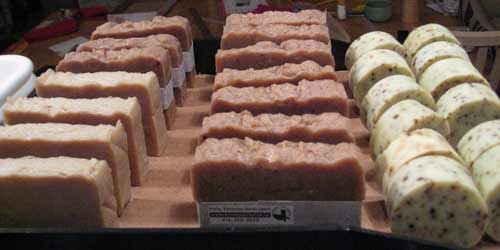
On the left are some bars quietly aging and drying. The square bars are hot process and will only need to dry and mature for a few days. The colour comes from cinnamon and paprika. They have been scented with cinnamon essential oil. The round soaps are cold process and will need to sit for 3-4 weeks. The specks are lavender flowers. That batch was scented with essential oil of lavender.
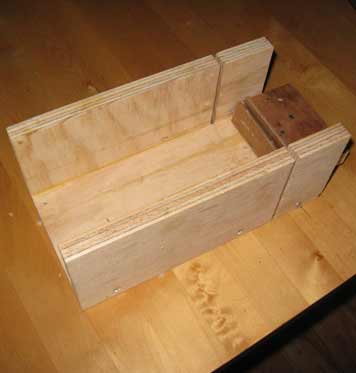
I used a mitre box and a knife to cut the soap. I have little cardboard spacer to adjust the thickness of the slice.
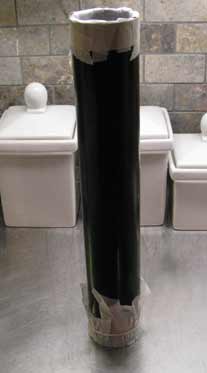
The small round soaps were moulded in a black plastic pipe lined with parchment paper as a mould.
The soap sticks to the mould if not lined. I tried and had trouble getting the soap out. Eventually I made a press to push the soap out of the mould. The same press can be used to make biomass briquettes. This is a link to my press. I have to use shorter moulds but it works very well and I don't have to line them.
Some Warnings
Until it is made into soap, lye is dangerous, treat it with respect and keep the cats and kids away.
When you cut your soap, if you come across pockets of liquid you might have some unreacted lye. This is not good. If you have a ph paper check the ph of the liquid. Some people put a small amount on their tongue and check if it tastes bitter rather than just soapy. It's supposedly an old trick but if you decide to do this be really careful. Lye is nasty. Better to give up on a suspicious batch rather than risk burning yourself. I keep my cutoffs and bits of odd soap and make my laundry soap with this. See below for a link to my recipe and instructions.
Don't forget to measure carefully.
Books and supplies about Soapmaking
emails: Christine
This article is provided for information and entertainment only. I am not an expert on soap making, just someone who has successfully done it several times. If you make soap take proper precautions, wear goggles and gloves and keep the kiddies and kitties away.
SOAP LINKS
Laundry soap Easy recipe using cheap ingredients. Makes a perfectly usable laundry soap and is a good way of getting rid of extra bits of home made soap such as trimmings.Some soap recipes I've had good success with
Wikipedia Soap Entry is a good introduction to soap making with a gentle bit of chemistry.
Soap Calculation Spreadsheet Chris Mathes' Excel Spreadsheet helps to calculate the proportions of fat, lye and water. It is also useful to determine the amount of lye required for each different types of fat. To be interactive you need to allow macros. Your virus check might block them. It opens with Exel or the free OpenOffice. You can save it to your computer.
THE Soapmaking website compiled by Kathy Miller. Recipes, directions, soap, lots of really useful content.
Soapmaking Forum
Supplier for many soap making ingredients and colour Bulk Apothecary
Soap Recipes
Soap Making Resource.com lots of supplies for the soap maker.Miller Soap Website has many recipes.
Making Soap with lye can be dangerous. Work in a well vented area or outside, wear goggles and gloves and keep kids, pets and other people away while you handle it. Once the soap is made it is absolutely safe though.