Glassing the bottom and getting some gunnels on the boat.
Here are links to other steps of the Puddle Duck Build
- Part One, What's a Puddle Duck? and I get Started
- My Puddle Duck Racer goes 3D It's official, I get my hull number.
- Next, I add flotation compartment.
- Bottom gets fiberglassed and Gunnels are added.
- Daggerboard case and seat get made.
- Making the daggerboard.
- Adding weight to the daggerboard
- Making the kick up rudder along with a tiller.
- I made a wooden sprit
- Finishing the carbon fibre mast I made a few years ago.
- Replaced the Broken Carbon Fibre mast with a wooden one.
- My PDR gets a mast step, plus side and front decks and more glass
- Finally Finishing the hull
- The Duck gets some hardware
- I make a Sail for the Puddle Duck
- My Puddle Duck Gets Launched!!
The Bottom gets some fiberglass

Although it is not necessary to glass the bottom of the PDR I plan to use it where concrete ramps and steel beamed docks are the norm so I put a thin layer of fiberglass. This is 4 ounces weight. I looked at the 2 oz cloth and found it too thin. I had sanded a very small radius on the edges and the 4 corners. I'm using slow epoxy and have lots of time to spread the resin. I'm finding that after wetting the cloth the plywood started absorbing resin and I had to add some more.
Many people only add epoxy tape on the edges and not everywhere. It saves money and makes a lighter boat.

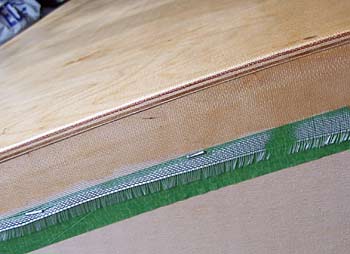
In order to get the fiberglass cloth to turn the corner and stick to the sides of the boat, I had stretched and stapled the cloth. This worked very well. It was tricky to do because the cloth seemed animated with an evil spirit, but eventually I had it stretched and fastened. When I put the resin on I did not cover the staples. I only turned the corner and glassed for about an inch. After the resin had had a chance to set somewhat but was not rigid yet, a couple of hours later, I went and cut the cloth and removed the stapled and the sticky extra cloth. It just pulled off nicely. The staples came off with pliers, it was easy because they had not really gone in very far. The cloth was nicely stuck to the side even though my radius is not very big, less than a quarter inch for sure. Later, I added another coat of resin to fill in the weave better.

Detail of staples holding the cloth to the boat hull while the resin sets. The staples were not in very deeply and pulled out easily. I did not worry too much about the width of the glass on the side. It is important to protect the edge from concrete but I expect the sides will be fine. I just ran my knife about an inch from the edge and pulled off the strip of extra glass and many staples as well. The rest came off with pliers.

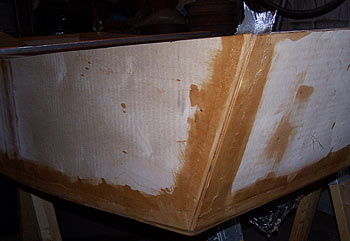
After cutting a whole lot of bias strips I stuck these to the edges of the boat. They went on with no argument and stuck down well. I am now confident that I can grind my little PDR against the ramp and not kill it completely. I suppose I will keep a jar of paint handy for touch ups. The boat is carefully levelled and will sit for a day or so. I checked my measurements and found that the diagonals were a very slightly off. Annoying because I though I had been careful. Sigh! Oh Well!


I cut a mahogany board in three quarter inch width and glued them to the side. The mahogany did not bend at all. In thinner strips I had to force the curve but it worked. All together it is a bit thicker than 3/4 inches and very stiff. I'm using epoxy thickened with silica, cabosil.
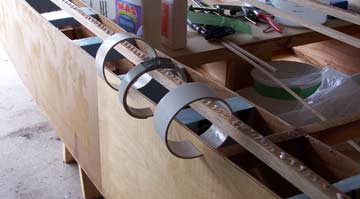
One trick I learned while building my Skerry sailboat is to use cut up water pipe as clamps. Here I've got them just keeping the gunwale from falling to the floor while I work on the other end. It allows me to work solo rather than need another set of hands.
I was careful not to clamp too tight because if the joint is starved of glue it is not strong.
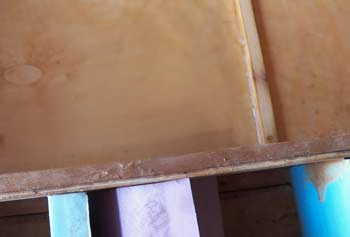
I also placed some gunnels on the inside (inwales). The inside and outside gunnel act to stiffen the boat and also as a platform on which I can glue the side decks. The edge of the plywood is very thin and the gunnels add some gluing area.

Inside gunnels (inwales) also need to be added. This is to support the side decks. The plywood edges are only a quarter inch thick and the extra width of the gunnels/inwales gives a wider gluing area.
emails: Christine
This web site reflects my personal ideas and doesn't represent anyone else's point of view.
Puddle Duck Racer Wikipedia entry
Article on Puddle Ducks in Sailing Magazine
Michael Storer Oz Version Nicely detailed build photos for his version (slightly different and not class approved but perfectly good) of the Puddle Duck, I think he calls it the OZ racer. His plans include a particularly successful daggerboard/rudder shape. He also has a number of really nice video of Ducks sailing.
Polysail has a nice very detailed instruction page for making puddle ducks. They also supply polytarps and kits for making PDR sails.
Polysail Leg of Mutton sail instruction.
My Boat Page