
Making a Simple Mould
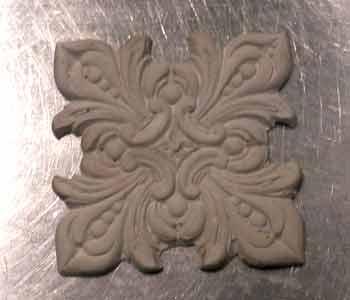
I wanted to reproduce a simple ornament to make a Medieval(ish) style mirror. These were in my Society for Creative Anachronism days. The original was a wooden stamped wood bit that I had peeled off a corny piece of furniture. This sort of ornament can be found in Home Depot or Rona.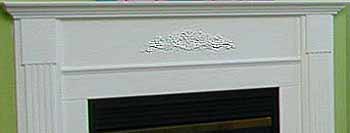 I've seen similar wooden ornaments used on Fireplace mantles. They are thin pressed wood. If you use one, choose a piece that is not warped, sometimes they are a bit twisted. I could easily have made my own pattern if I had not found anything I liked. Using regular clay works well. Plastercine also works but it must be sealed with a spray of paint because regular plastercine has sulfur in it and this inhibits the curing of silicone.
If you make your own model, remember not to make undercuts or patterns that would trap the finished piece and prevent it from coming out of the mould.
Making the pattern ready to make the mould
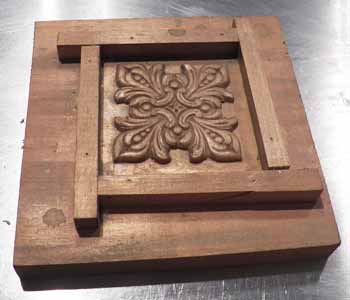
The pattern is glued on a piece of wood and strips of wood make a simple frame around the pattern. The piece was a bit rough so I sanded it slightly and put a small amount of caulking where it connects to the board. This is to prevent the silicone from getting into cracks and under the model.
This model was sprayed with some gold paint I had around to seal it and make it easier to release. Once the paint had dried I put a thin layer of floor wax using an old stiff paintbrush.
If I was making a detailed mould I would have taken more care to finish the model better. In this case I did not mind if the finished product was a bit rough.
There are many types of mould release in use. Some people will build up a thin coat of soap on the model. There are also commercial releases such as polyvinyl alcohol which works very well and gets sprayed on thinly. Petroleum jelly is often used.
Pouring the silicone mouldmaking material

Mouldmaking silicone comes in many flavours. I had some of this leftover from a gargoyle making project. It is a 2 part liquid that needs to be carefully weighed out and mixed exactly. It makes great strong moulds that are quite elastic. It has 2 main faults. It is important to get the proportions of each liquid right so you need a scale and it tends to flow into the smallest crack. This means that your pattern and frame must not have any gaps.
One way to get around this is to add a thickening agent. Just a few drops have a big effect and thicken the pourable material. In this case I added too much thickener and the silicone quickly became a sort of sloppy wet dough. I brushed on a coating on the original model and spread the rest in the frame. it's very sticky and does not flow.
Many people have experimented using silicone bathroom sealant, either as it comes out of the tube or thickened with corn starch or talk or other powders. They work but are not as strong and elastic. This would work very well for this model since there are no undercut. I've used silicone sealant alone and found it perfectly usable. I brushed the first coat on to get it in all the small areas of the mould, then just squeezed the rest straight out of the tube.
Removing the mould out of the frame
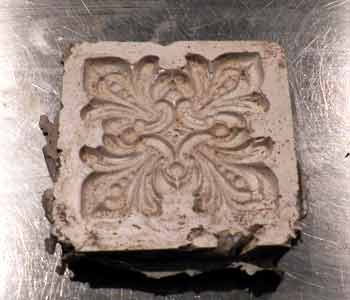
In spite of the overthick silicone, the mold worked and after setting for a few hours I was able to easily remove the mould from the frame.
This photo was taken after the mould had been used several times so it is quite dirty. The mould is actually quite smooth. Really...
The silicone had not flowed into the corners of the frame very well but the ornament was completely surrounded and the surface was good. Silicone makes a very detailed mold and will pick up alot of detail.
If you are interested in experimenting, I've used silicone sealer in caulking tubes with good success. it's not very expensive and can made quite a good mold. Some brands can be diluted with solvents and the first coat brushed on to the model. After your model is covered with a good smooth coat of diluted sealant, thicker material can be squeezed and smoothed on.
Filling the mold
Since I had not leveled my mould very well I put it in a bowl of sand to support it in a level position and poured a plaster mixture in. (This is a quick moulding I did later and just put little pieces of wood to level the mould.)
The plaster was an extra hard industrial plaster. It comes out feeling more like concrete than plaster of paris. It is possible to add burlap in the plaster if you want a stronger piece. I've heard of people putting fiberglass seam tape in the plaster too. I guess that would work. In this case all the ornament had to do was be strong enough to come out of the mould and get glued on a support so no strengthening was necessary.
It is helpful to vibrate the plaster before pouring it so that bubbles will be brought to the surface. If you have a vacuum vessel you can use that.
It's important to fill your mould to the top otherwise the ornament will be quite thin.
It takes about an hour for this plaster to set and a bit longer to dry.
The cast ornament
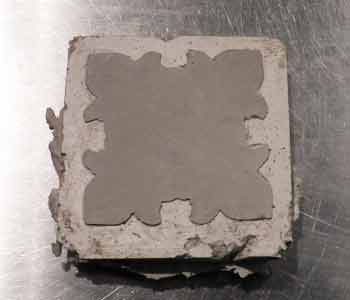
Here is the little ornament out of the mold. I have a small knife I use to trim any bit of flashing that can form around the edge and the corners if the plaster splashes out of the mold. It is quite had and solid.
Sometimes there are small air bubbles that get trapped in the plaster and leave small empty spots. These can be touched up with some plaster once the ornament is out of the mold
The thin ornament can warp when it dries, it's better to keep it flat and let it dry slowly. Putting a loose piece of plastic on it will work.
If the back is not smooth or flat enough for your use it is possible to rub the moulding onto a piece of sand paper glued to a flat board. If the ornament had warped, I would have used some plaster mixed in with white glue to fill any gaps.
I used white glue to attach it to the frame I was making, put a couple layers of primer on the whole thing and painted and antiqued the frame. It worked very well and was much less expensive than if I had bought a whole lot of ornaments instead of making them.
See the top banner image for a sample of what this simple ornament can look like once painted.
I try to be accurate and check my information, but mistakes happen.
email me if you find mistakes, I'll fix them and we'll all benefit: Christine
Mould Making Materials
Smooth-on website is a goldmine of information and How to.
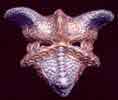
Many of my masks are made in a mold Here are a few of my masks.
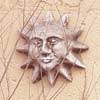
Many garden ornaments I've made were made from silicone moulds and moulded in plaster, as is this sunburst.
Sculpture Supply Canada has moulding supplies among other things. Lots of fun to look through the website. They have various kinds of plaster too. More technical than Smooth-On.
Arms Model It has moulding supplies They are in Australia.
Alumilite Mold Making and Casting Products Lots of DIY information on moldmaking and Casting.
Plaster makes a good mouldmaking material particularly if what you want to make is softer, such as a mold for papier mache.
A rule of thumb for molds and casting material is: if you want to cast a soft material such as clay pressed in a mould, foam or some of the rubbery resins, then a hard mold is useful. If what you want to cast is rigid then a soft mould is better.
A few people have experimented with silicone caulking mixed with corn starch for simple mouldmaking. This seems to work quite well. I have not tried it but it's worth checking out.
Small Print
This information is for general knowledge. I don't suggest that this is the only way or the best way. Use your head and do your research. Conditions vary hugely and quickly. Some of these materials can be dangerous. Use protective equipment if manufacturer recommends it.