
Steps in Building a SCAMP sailboat
Links to all my scamp building pages.
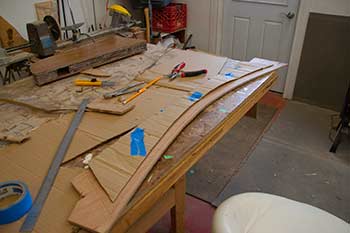
The Scamp Transom and various other bits.
Before I can install the garboard and other planks, I need to get the Transom sorted out.
I also need to sort out a couple of glitches and make quite a number of fillets.


The transom gets a doubler to help support the rudder. I used my router to cut the opening in the doubler. I already had made the hole in the main piece and just used a flush cut bit to follow the opening and duplicate it in the doubler.
When I cut the transom I also made the various bevels. The bevels are necessary because the hull planks intersect the transom at an angle, and the bottom is also angled.
The transom will also get another reinforcement piece where the motor could attach. It's not easy to do this after the boat is built so I have to decide and add the backing before the seats get glued on.
I think I will add a 2-3 HP motor or maybe a trolling motor just as a back up. Oars are not always enough in the big winds that sometimes blow up.


I checked that the transom and the various bulkheads were lining up properly and made a fair curve with the various little cut outs that will house the carlings that support the side decks.
I also tried the plywood side deck piece and it fits fine. I will need to figure out exactly where it ends up on the transom so I can cut the indents that support the ends of the carlings.

After cutting and fitting 2 small sticks I glued them on the ends of the seat verticals. These will help align the transom and provide bigger glue surface. It will also give me something to clamp against as I fit the various parts together. There will be many such sticks on the scamp.
Filleting
Before I attach the transom permanently I want to complete most of the work on the various compartments located under the cockpit floor.
There is quite a lot of filleting, sanding and finishing to be done. It's easier to access without the transom.
For this part I wish the boat was a bit lower. The height has been good up till now and I think it will be a good height to plank.

I had not filleted the various inside compartment. I did this today. It's one of my least favourite jobs but I put some nice music on and got on with the job. I'm showing one of the better ones. The rest are ok. I don't suppose appearance is very important since they are closed compartments. They are accessed by various water tight doors. I also made some good substantial fillets around the water ballast tank and against the seams that support the centreboard.
I also added a couple of fillets in the front section.

I had forgotten to cut a limber hole in one of the bulkheads so I did this. It's such a simple job on the flat, and such a fiddly one when glued up. It's hard to get enthused about things that are completely hidden. Once the hole will do it's job it's a excercise in will-power to make it look nice-ish.
Fixing a problem


I noticed after gluing the seat uprights that they were slightly higher than the bulkhead. They should have been the same height. I put little tape markers and measured heights and level differences.
I had glued the transoms correctly and they are nice and level and symmetrical on both sides. That's a relief because they guide the planking.
When I glued the seat upright I must not have had it pushed down completely on the bulkheads slots because it ended up about an eight of an inch proud. They were fine when I checked and dry fitted them. It took me a while to figure out what was the problem and I did not want to start equalizing without knowing the why. Human error.
I used my bench plane to cut a fat eight of an inch and the problem is mostly elimimated. I will have to re sharpen the plane, this stuff is hard on the edge.
I can now start glueing on the support pieces. These give extra support for the floor and the bench top. I did not dare do this until I had figured out why the 2 sides were not even.
Making a separate watertight compartment
When I cut out my bulkheads I made all the lightening holes that were marked on the plans. In the manual they suggest making the last compartment at the back a separate watertight area by filling in the drainage and the lightening hole. This way there are 2 small airtight compartment in the very back. It seems like a good idea and not particularly difficult to do.


It was easy to cut the round plugs and glue them in place. The little limber hole plugs were annoying to shape and hard to keep in place but are setting now. Since I was planning to put a round access hatch in the back section anyway I don't need to change anything.


I spent a few hours sanding and smoothing the outside parts and forward sections. These will all be closed in. I then put another coat of epoxy on everything. Most parts now have 3 coats. I still have to touch up a few more spots but I'm not planning much more in these areas.
I still have to sand the inside of the mast case where I put glass on the seams. It's difficult to reach. The glass is filled but uneaven.

I went looking for some talcum powder to help me get gloves on when my hands are damp and I found this one. It's sold for cyclists and other sports people to prevent irritation. I bought it years ago when I cycled a lot.


After taping the transom in place with duct tape, I was able to check the fit. It was a bit wobbly and I had to sand off a slight bulge in the end portion of the seat verticals. When I had cut them I had been just a bit off and this made a difference on how the transom fit.
I also had to adjust the angle of the liner piece. It now fits perfectly.
After a final check and a coat of epoxy, the transom gets glued on. There is not much to clamp from so I used tape again.
With the transom in place I can start installing the strakes.


The planks are going on with no problem. You can read details about how I installed the sides here. They extend a small distance beyond the transom and will be cut flush after installation.
While things are easy to reach, a doubler is placed against the transom to reinforce the area in case I want to put a small motor on the scamp. I'm using a stick to push against the doubler, there is nothing to clamp to.


Once the sides were solidly in place, the planks were trimmed flush to the back.
At this point the side decks were installed over a fitted framework. The cockpit coamings were also installed. At this point the transom can get it's cap.


I prepared the transom cap and doubler. This fits on top of the transom. The plywood was quite stiff so I pre-bent the cap and doubler so there would not be too much tension.
It took awhile before I installed the transom cap. I worked on the side decks, floor, side coaming, gunwales and more. Eventually I got back to the transom cap.
I had some trouble thinking about how I could put this in place and clamp it. Eventually I used a ratchet strap I had gotten from the Dollar Store years ago. I had bought a couple to use the straps. I had taken one apart but did not use the second one. This worked very well to pull the cap around.


I measured the cap and tried it on a few times to get the angle of the end more or less accurate. It's a good thing that I plan to paint that part!
Eventually I figured I could not improve the fit and did a dry run. I put in screws at both ends of the cap and also one at the top of the transom into the double thickness of plywood.
I had also prepared a block of wood for the centre of the curve, which had the same angle as the cap was probably going to have. It helped support the cap while I fiddled with it and glued it and screwed it and tightened the strap.

The transom cap has been glued and temporary screws put in. I think I will put in permanent screws later.
I had to do a bit of judicious filling of gaps but it went together without too much trouble.
I went back later after the epoxy had set some to back off the screws some and remove the block of wood so it would not be glued in place.

Next step is to cut and install transom cap doubler. I had cut an extra transom cap to use as a doubler but I needed to fit it. I made a cardboard pattern and used it to cut my doubler.

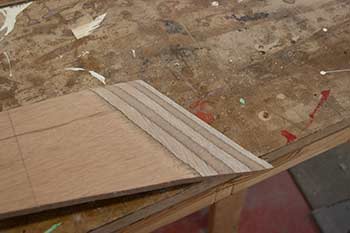
After cutting the doubler, I pre bent it for a few hours. The shop was quite cold when I cut and everything was very stiff. After warming up it was easier to bend.
I used my block plane to cut the bevel.

Installing the piece was tricky. I had to bend it, then insert and fiddle the position.
I had covered the existing cap with epoxy and glue, stuffed some thickened epoxy at the very narrow ends, covered the bevel and the glued side of the doubler with epoxy and thickened epoxy. I had put more glue than I needed but I was afraid there would be gaps.
I got it mostly positioned but I had to use a clamp at the top centre to bend it while I fiddled. I clamped it loosely so I could slide it. Eventually I used a couple clamps on the edge to pull the edge of the liner towards the transom. I was having trouble pushing it and tapping it in.
Eventually I was satisfied that it was as good as it would get and I clamped the doubler in position using waxed paper. Everything was quite sticky by then.
What is annoying is that the doubler is slightly too wide and I will have to trim it. Even with the pattern I over cut the width. The length was good.


Transom cap doubler is trimmed and is now flush with the cap. I used the orbital sander for this and when it came to trimming against the edge, I used the Dremel multi tool with a narrow saw attachment. I took quite a lot of time to do this because I did not want to scratch the side deck. At this point the wood is good enough to be left unpainted. I have not yet decided on my colour scheme.

I also trimmed the back of the transom so that the cap and transom are flush. It's mostly done, I still need some light sanding.
emails: Christine
If you decide to build a boat be careful. These tools can be dangerous. If you don't know how to safely handle something find out. There are lots of forums out there.
This web site reflects my personal ideas and doesn't represent anyone else's point of view. I don't claim to be an expert in anything, just someone muddling along.
SCAMP envy/Lust This is a thread in the Wooden Boat Forum.
You never have too many clamps
Router guide.
My sander is getting quite a workout. I often use it instead of the plane to remove just a little bit of thickness, particularly when there are knots or crazy grains or I'm working on plywood.
Rasp is another of my go to tools. I read a story that you can sharpen files by dipping them in a sulphuric acid solution. I'll try that some day.