Strip Planking Boat Construction
Definition of Strip Planking, ANCIENT and NEW
Strip building of boats has been around for a long time. In the past large boats were carvel planked with heavy boards attached to solid ribs using sturdy fasteners or wood dowels. Caulking of tar and fibers was driven between the planks and when the boat was launched the boards swelled, came closely together and formed a mostly watertight hull. As the boat was sailed the planks worked and moved with the humidity level and the stress on the hull. Carvel planking in this tradition is rarely done now. Large Yacht gets strip planking build diary.

Picture from the 2013 boat show. Lovely simple old motorboat built with strips of wood.

Detail of the ribs and interior, very pretty boat.
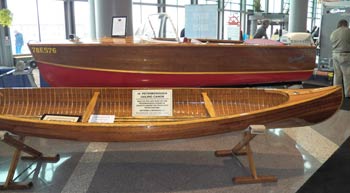
Peterborough canoe would have had a canvas skin before the days of fiberglass. The motorboat behind it was intended to be clear finished. Both built with ribs.
With the development of new adhesives, such as epoxy, it became possible to solidly edge glue lumber. The screws and dowels were no longer required. This made the modern version of strip construction possible.
Nowadays if someone tells you he has build a cedar strip canoe he likely means that he set up a series of forms, fitted long flexible thin strips of wood across the moulds gluing the strips to each other, smoothed out the hull and covered it with epoxy and fiberglass. After removing the forms he finished the inside in the same way.
The resulting boat is light, strong, rigid and waterproof, and closer in behaviour and upkeep to a monocoque fiberglass shell than to a carvel planked boat with many ribs.
Strip building is one of the few ways an amateur boatbuilder can build a smooth rounded hull with compound curves. Plywood is capable of bending in one direction but as soon as you get bends in more than one plane the plywood starts complaining. Tortured plywood has limits before it breaks and often it is necessary to wet it to make it more flexible.
It is also possible to build boats with asymmetrical hulls where both sides are different. That is the cross section of the hull is not equal on both sides. This is sometimes seen in Proas where the main hull is shaped differently on each side. This is how Gary Dierkin builds one of his proas, Gary Dierking's lovely T2 proa is a strip built boat which has different profiles on port and starboard. His book Building Outrigger Sailing Canoes: Modern Construction Methods for Three Fast, Beautiful Boats has plans with sufficient information to build but he also offers fulls plans.
What kind of strips are used?
Strips crafted for strip building are often cedar, but arguments rage hard and fierce as to the benefits of other woods. Western Red cedar has a massive following. It is gorgeous, light and strong. It is available in clear pieces, and can be bent around curves. Advocates of Eastern White cedar claim it is easier to bend and nicer to work with. The truth is that any clear light bendy wood that can be worked without undue splitting and glued using epoxy can be used. It does not even have to really be strong because the epoxy will supply the needed strength. An extreme example is Michael Storer's experimental Balsa Stripped Canoe.
Because the strips are bent around the shape of the hull the wood has to be thin enough to bend. For this reason it is rarely thicker than 3/8 and more often 1/4 inch or even 3/16 inch thick. Extreme thin strips made to produce ultra, ultra light boats have gone down to 1/8 inch.
The width of the strips is also quite small often no more than about 3 times the thickness. If the hull shape is simple with gentle curves then slightly wider strips can be used. For complex shapes and keels, narrower boards can more easily be bent around the narrow curves. Narrower boards are also easier to fair than wider boards because there are not such large flat areas.
How are the strips fitted together.
Two methods are commonly used to fit flat strips around a curved form and not end up with gaps. Some builders rout a bead and cove in the edges of the strips. The bead of one board fits neatly in the cove of the next with no gap in between. Alternatively the builder shapes the angle of each strip as it is added to the hull.
Now for a bit of heresy. It is possible to assemble a hull with no significant shaping of the strips as they are fitted onto the forms. Gaps are filled with thickened epoxy, faired, and the hull covered with fibreglass and epoxy, then usually painted. Since the main purpose of the strips is to create a core, there is no loss of strength. HOWEVER since strip built boats are usually put together to look beautiful, in fact it is often the main reason to choose wood strip construction, few people go this route.
In a perfect world, strips intended for strip building, are long enough to reach the whole length of the boat. In the real world, few people have enough space to rip 16 feet of lumber, even if they can get the lumber, and get it home. Most longer boats have joins called scarfs. The 2 boards to be joined get long bevels and these are glued together. Although strips are not subject to much stress and don't need long scarfs for reason of strength, they need to bend evenly and long scarfs do this. It is not unusual to have 7 or 8 times the thickness as the length of the scarf bevel.
To buy or not to buy that is the question.
Many lumber suppliers and boat kit makers will supply strips with the bead and cove already milled in. It is a huge time saver not to have to rip the strips, plane them to correct thickness then cut the bead and cove. The convenience comes at a cost though. Noahs supplies strips with bead and cove. They also supply router bits if you want to cut your own.
Setting up the forms
Before the boat is planked a series of forms, shaped like cross sections of the boat, are carefully cut and set up. Plywood or particle board is often used to make the forms. Since the forms determine the shape of the boat great care must be taken to set up each mould at the correct distance and square to the base. These temporary moulds make up the skeleton of the boat as it's being built, and act as temporary ribs. This frame will support the strips as the shape of the boat is gradually built up. Once the outside has been glued and glassed it is rigid enough to stand on its own and the form is removed.
Since there is going to be lots of gluing around the forms, it's a good idea to cover them in plastic or packing tape to prevent the strips from sticking to the temporary forms. Sometimes the forms are designed in several pieces so that they can be taken apart by removing one of the pieces. This is particularly useful if the cross section of the boat narrows significantly at the gunnel.
Nailing vs. hot glue vs. glue and clamps
This is another hugely controversial point in cedar strip building. How do you attach the strips temporarily to the frame until the shape has been built up and the hull is ready to fair. Simplest and fastest is to put a staple or nail through the strip and attach it to the frame, then remove the staples when it's time to fair the boat.
BUT ...! argue some purists, this leaves a hole and is not perfect. AH! argue the staplers, the holes are practically invisible. It is quite possible to glue and clamp each strip using clamps and straps and thus build a hull with no staple holes. In this case the frame have convenient holes made into them to allow the clamps something to clamp against as they pull the strips in. Gluing and clamping does take longer and limits how many strips can be done at one time. You also need a lot of clamps. Dabs of epoxy is sometimes used as is TitebondIII which is waterproof. Some builders have experimented with cyanoacrylate crazy glue such as Gorilla Super Glue or Loctite,which have the advantage of a very quick set and good strength. Others argue for Polyurethane glues.
Some people have used hot glue to tack each strip thus avoiding most of the clamping. When done the hot glue gets chiseled off and the boat gets faired.
Laughing Loon Stripping description and shop tips. He likes to use hot glue and describes his process.
Starting at the bottom or starting at the top?
If you start laying down the strips at the sheer (where the gunnel is) you will have nice strips that run nicely along the side of the boat but have to be fitted at the bottom or keel area. Conversely if you start at the keel, and just keep going, then it's absolutely certain that you will NOT have nice parallel strips running along the top edge. If you plan to paint then it does not matter. If the wood will be natural colour, then you need to think about this. Of course it is possible to start both at the bottom AND at the top and fit the strips together wherever you choose to have them meet, usually near the curve where the bottom meet the side.
Which ever way you decide to plank you will have an area that will need fitting and trimming of strips.
Who's the fairest of them all?
Your hull is now completely planked. All the staples, or hot glue, or clamps have been removed and any drip on the outside knocked off. Small holes and gaps have been filled and any dings steamed out. It's time to fair (smooth out) your hull. If you have been careful and used narrow boards this is relatively simple. Using a plane, or random orbital sander get rid of the edges of the strips that stick up and make the hull smooth and even. You will start with coarse sandpaper and gradually use finer grades. Since the strips are soft, go easy and slow. Use your eyes and hands and change the light around so you can see any problem. If you have small gaps now is the time to fill them. Take your time.
There is no need to go as fine as 220 since the hull will be glassed but it should feel smooth to the hand, and have no flat spots.
Glassing the Hull
After fairing and cleaning the dust off the hull, it gets a coat of fiberglass cloth. Various thicknesses are available. The plans will specify what weight of cloth is necessary. Some cloth is very thin and adds almost no weight to the boat. If no instructions are available 6 ounce glass will do the job. Once wetted out with epoxy the cloth will be virtually invisible. Take care not to get bubbles and to thoroughly wet out the cloth.
Do not use any thickening agent in the hull glassing. Fumed silica (cabosil) is sometimes used to reduce the number of coats required, and save time. It's fine if the hull is to be painted but will show as a veil effect in the sun if the hull is only to be varnished.
I have experimented with many ways of applying resin on cloth and my favourite is using a piece of hard foam as a trowel to gently work the resin into the cloth but not have extra resin on top.
It will take 2 or 3 coats of epoxy to get the weave fully saturated and the coating smooth. At this point you can sand to your heart's content to get a perfectly smooth surface before you varnish.
Once the outside is sanded, the boat is removed from the frame / strongback and turned over. The inside now needs to be smoothed, faired and glassed, then sanded again.
It's a good idea to include some form of flotation on your boat. If you want to build a water tight compartment this is done at this stage. It's also possible to use strap in bladders.
Gunnels Seats and Thwarts
At this point you will need to shape and attach seats, thwarts often with a carrying yoke, if this is a canoe, and any sailing modifications and of course the gunnels.
Varnishing
Varnish (or paint) is necessary to protect the epoxy which degrades in sunlight. Here is a link to my page on varnish.
Use Spar Varnish with UV protection. It comes as traditional or Polyurethane based. The Traditional varnish is often a more golden colour while the polyurethane can be crystal clear, although sometimes it is tinted. The difference in price and quality usually reflects the solid content of the varnish so that a cheaper brand will not build up as quickly and you will need more coats to get good protection.
Polyurethane based spar varnish can be applied over traditional varnishes but traditional varnish cannot be used over polyurethane. It will eventually peel off.
The last step is putting on whatever hardware you have decided to include. This could be an eye at the front for a painter, or rowlocks, or stem bands to protect the bow and stern.
Youtube video on building a classic Moth sailboat. They go through the steps and end up with a lovely sailing dinghy.
email me : Christine
Small Print
This information is for general knowledge. I have not personally tested these boats. I can't say if they are safe. If you build a boat be careful. Using tools can be dangerous, get help and advice if you are not certain.
