
I have launched the little dinghy and posted a video on youtube showing her being rowed and being towed.
Stitch and Glue Apple Pie Dinghy Tender

2 People and a wiggly dog can easily ride in the Apple Pie Tender. This little boat is doing her job perfectly. I'm using the more forward oar locks to even out the weight in the boat
She can carry 3 people without any trouble BUT you have to spread out the weight evenly. This is particularly important when getting in and out. There is not a huge amount of space in a 7 foot boat so 3 people is crowded but there is still good free board.
I build a tender for my keel boat, a Tanzer 22.
Sweety is away for 10 days so I decided to sneak in a boat build while he was away.
My Tanzer is on a mooring and there are not so many club tenders available. Plus I really enjoy building boats.
Chuck Merrel offers free tender plans for this little boat. It is a plywood stitch and glue adaptation of a William Atkins' Rinky Dink dinghy. Read its story here. He offers this free tender plan as a pdf.
I'm hoping to end up with a solid serviceable tender that I can sail, just for fun, I don't really need another sailboat. It should be finished within a 10 day period because that's how long Sweety is away. This means a somewhat rough fiberglass and paint finish.
I made Gavin Atkins blog page,"In the Boat Shed"
with my Apple Pie Dinghy build!
DAY 1 of building the Apple Pie Dinghy
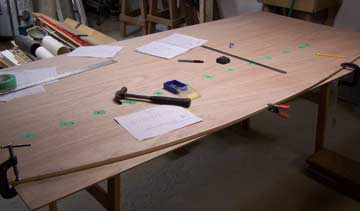
Layout of measurements on plywood. I'm using Meranti, quarter inch for sides and bottom and 1/2 inch for bow and transom. Here the bottom is being laid out. I'm using a long strip of plywood to join the points smoothly.
Meranti is heavier than okume so I expect my boat will be heavier than if I used Occume plywood.
** After using the tender for a year I'm sorry I did not use lighter ply. Since I fiberglassed I did not need the strength.

I used a jig saw for all the curved parts and a table saw for straight cuts. If I had a small circular saw I would use it and would end up with better edges. Luckily in plywood stitch and glue boat building method its not so much of an issue.
I have found that with this wood a metal blade gives me a cleaner cut. It is slower though.

Main pieces of the boat have been cut. I drilled one eight inch holes along the edges for stitching. After cutting the first side, I just placed it on the plywood and traced it. I then cut right on the line and got a good match.
I've made a little scratch on my saw guide and it allows me to position the cut very accurately. The bow and transom pieces are half inch Meranti plywood with lovely colour.

Tilley inspects the parts in the back yard. I measured my basement entrance and it looks like I could get the boat out. I expect it will weight over 75 pounds and that's a bit tricky to move around stairs and bends. So I'm building outside. I expect the fiberglass laying will go faster because of the heat.
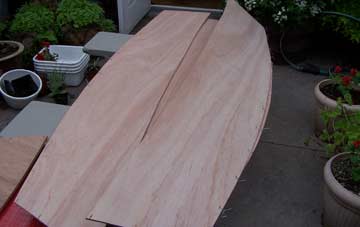
Starting to assemble the boat using steel wire. It seems to wiggle and resist but eventually the boat pieces falls into place. The steel wire seems much stronger than the copper wire that was recommended for the Skerry build. I can twist the wires and tighten more easily.
I plan to remove the wire before finishing the boat so it doesn't matter what the stitches are made of. In stitch and glue construction the wires are often left in.

Roughly stitched. Next step is to fine tune and tighten the wires till the boat takes its shape. It is on 2 garden benches. I used a pair of wire cutters and a few tongue depressors and a spatula. These help me position and move the parts till the edge corners are together. Some builders say to bevel the edges to have a flat piece but I just used the tongue depressors and used weight to position them properly. They only have to hold for a couple of hours until the epoxy has set.

Using thickened epoxy to tack between the wire stitches. (detail)
Weights help the boat take its shape and support the tongue depressors keeping the edges in position. The little boat is supported at both ends but not in the middle. I have small gaps at the bow. I assembled the pieces corner to corner but it might have gone better if I had overlapped the parts. Corner to corner creates a gap that needs to be filled.

Measured the angle and width and cut bulkheads. Made holes and assembled with wires. I checked to make sure the boat was level, tacked the bulkheads a.k.a. seat supports, and let the epoxy harden. Already the boat is quite stiff.
END OF DAY 1. I have a shell put together and tacked.
10.5 hours and already she looks like a BOAT!.
emails: Christine
This web site reflects my personal ideas and doesn't represent anyone else's point of view. Remember I'm not suggesting that this boat will be perfect and that I KNOW what I'm doing. Use your head and do your research.
Boatbuilding books
Boatbuilding for beginners:
Ultra simple boatbuilding

Buehler's Backyard Boatbuilding

The Master Craftsman's Collected Teachings on Boat Design, Building, Repair

Featherweight Boatbuilding, has plans and instruction to build a Wee lassie canoe

Boat Building Supplies
Epoxy
West System Starter Kit 2: 1 Gal 105B, 1 Qt 205B, 300 Mini Pumps

Glass tape and cloth
Fiberglass Cloth Tape, 6 oz, 4" wide by 50 yards

6 oz Fiberglass Cloth, 50" wide, per yard

DEWALT DCS331B 20-Volt MAX Li-Ion Jig Saw with DW3742C 14-Piece T-Shank Jig Saw Blade Set and Case

Random Orbital Sanders are similar, the better brands last longer, are less noisy and easier to handle:
Makita BO5041K 5-Inch Random Orbit Sander Kit

HOME
Deciding on a Boat Plan
My Boats
Ten essential Knots
Rope material, Polyester
Stitch & Glue Building
Marine Plywood Standards
Boat Plans Free Stitch & Glue plans
Puddle Duck Racer build