

Steps in Building a SCAMP sailboat
Links to all my scamp building pages.
After turning the boat back upright I can finish the topside and interior of my SCAMP
The paint has had a chance to harden. It took a bit of time because it's quite cold still in the shop.
I followed the same procedure to turn the SCAMP right side up as I had to turn it upside down. Link is to details and to a video.


I asked my neighbour for help and he gathered up his son, friend and wife and we easily turned the boat in the straps.
The straps allowed me to lift the boat off the sawhorses and remove them. I put a couple of 4x4 under the skeg area and it was simple to just lower the boat gently down. The straps with the ratchet make it easy to lift the boat and give a level of safety in case someone drops their end.
Finishing the Cuddy
The little cabin had been assembled and the top glassed before, but I had not put in fillets or tidied up the edges.


There is no major woodwork to do but a lot of finishing and cleaning up epoxy. I also have to round the various edges. It's actually quite pleasant to be working on the top again. I've set it down so it's much lower and easier to work on than when it was on the building cradle.
It took a bit of time to round the edges of the drainage holes. I had only roughly trimmed the glass so I did that, and readied the joints for filleting.


Fillets and rounding of the cuddy is pretty much done. A couple spots left to touch up and another coat of epoxy to do but otherwise good progress.
Back Cowling
I have to decide how to proceed with the back cowling. As it is it overhangs the sides but I still have to install the outside gunwale. I have to figure out how all that goes together. I have a couple of nice ash boards for the outside gunwales and I might want to leave it bright, so it's important that the back fit nicely otherwise it will strand out. To be continued ...
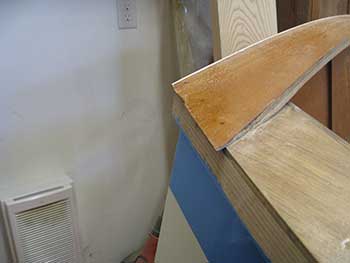
Rounding the cowling
I got the router ready and set up to round the inside and outside of the cowling. It needs enough rounding to be comfortable to the arms while sailing.


The last time I had gone to the Hamilton Woodworking show I had bought a nice rounding bit with a half inch shank. My old one was on it's last legs. It was one of these sets you buy in the big box stores as a promotion, and the whole set of 12, 1/4 inch shank bits cost as much as one good bit. Still I got good value out of the cheap set.
I don't know why I worry so much about using the router. Maybe it's the noise. As usual the routing went without any trouble and made a lovely smooth edge. The radius is 3/16 and it feels just right.


I used files and sandpaper to get the rounding done where the router could not reach. I still have a bit of finishing near the base of the back of the side cowling but not too much work. I'll also sand the bottom edge to round it a bit. I don't think I'll use the router though.

I knew I had a mouse in the shop but I had never seen it. He finally came around while I was quietly working. I made a trap and so far I've released 5 mice. I guess I have more than I thought!
I Continue Working on Topside
emails: Christine
If you decide to build a boat be careful. These tools can be dangerous. If you don't know how to safely handle something find out.
This web site reflects my personal ideas and doesn't represent anyone else's point of view. I don't claim to be an expert in anything, just someone muddling along.
I pay for maintaining this website by having links to Amazon.com. I choose the ads to be relevant to the content. Mostly stuff that I buy myself or lust after. If you buy after clicking one of the links I get a small fee.
Carbide blade scraper is one of the most useful finishing tool I own.

Warner 804 Tool 2-Inch Carbide 100X Scraper with Knob by Warner Manufacturing
Brightside, polyurethane comes in a whole range of colours. I've used it and really like it.
Oscillating multi tool is also very useful for sanding in corners and in hard to reach areas.

Rockwell RK5151K 4.2 Amp Sonicrafter F80 Oscillating Multi-Tool with Duotech Oscillation Angle Technology. 12 Piece Kit includes 10 Accessories, Carrying Bag, and Oscillating Tool

Fandeli 36014 220 Grit Wood Sandpaper Sheets, 9" x 11", 25-Sheet
Inexpensive rounding bit kit gets you started.

Yakamoz 6Pcs 1/2 Inch Shank Round-Over Router Bits Corner Rounding Edge-forming Roundover Beading Router Bit Set
Freud rounding bits.

Freud 5 Piece Round Over/Beading Bit Set (1/2" Shank) (89-152)

LifeStraw Personal Water Filter for Hiking, Camping, Travel, and Emergency Preparedness

Stanley Classic Vacuum Bottle 1.1QT Hammertone Green