
Steps in Building a SCAMP sailboat
Links to all my scamp building pages.
Making the Scamp Centerboard

SCAMPs have a weighted centreboard located off center into the starboard seat/flotation chamber.
I'm planning to glue the blank from 2 pieces of 9mm and 2 of the 6mm plywod. I've cut the blanks from left-overs from the plywood. It's a bit short of the required total thickness but I'm hoping the thickened epoxy glue will bring me to the total.
I'll glue 2 pairs of 2 pieces and then the next day stick then together. I'm doing it that way to make it easier to handle. It also will allow me to check the thickness and add more material in the middle if I need to.
Preparing the Centreboard blank for my SCAMP


The panels are setting under weight. Almost every clamp in the place is being used for mast staves so I quickly scared up some paint cans for weight and the epoxy is just squeezing out a little. All is well.


After setting all night I checked the thickness of my panels and I'm going to be short about 1 mm. I decided to add a layer of fiberglass cloth between my 2 sets of panel blanks. Here is the glued up blank with the glass cloth in between the 2 pieces. I have lots of weight and the glue is just squeezing out. I added some silica to thicken the epoxy and better fill the cloth. I think this will be perfect and I'll have my exact thickness.
The Centerboard blank is glued up and almost the perfect thickness. I'm thin by about half a milimeter so I can live with this. I laid out the shape, checked it twice and cut it roughly on the band saw. I was not confident that my jig saw could saw through this thickness without the blade bending and making an uneven edge. It's quite heavy and it was a bit tricky to hold it to the bandsaw. I dinged a small spot on one edge.


I used the belt sander to fine tune the edge of the centerboard. I'm ready to start shaping it to become a proper foil. I checked a cut off piece and the joins are good. I can't really tell where the joints are.
I made a template from the plans


Making a template for the foil cross section. I checked it against the plan and it's almost perfect.
The foil is shaped fore and aft but the centre part is flat. My next step is to mark up the blank and start shaping.
I have not decided how I'm going to shape it. If the ply will cut well with my bench plane then I'll use that but if it tears out I'll use the belt sander and then the random orbital sander. I've found that some of the plywood was quite brittle and did not plane well. Luckily for me the plywood is evenly glued so I will get nice plywood lines to help me shape it evenly.
Shaping the Scamp Centreboard
I've decided to shape the centreboard by routing steps and planing these smooth. I expect to finish off by sanding the edge to get rid of any tear-out.

Because the edges of the centreboard are not straight I made a fence so the router could follow the exact curve of the board. I did that using a router bit with a bearing to copy the exact shape of the blank. I then clamped the fence along the edge and used the router to cut steps at the proper depth. I figured out the depth from the plans.
The cutting was simple and I just had to follow the fence. I had clamped it badly for one pass and it shifted just a bit but I caught it before any damage had been done. I now have steps at the proper depth and all I have to do is smooth these to a slope. I used my plane first, then used the sander with 60 grit to get rid of a couple of spots that had tear out from odd grain.

I checked the centreboard against the template and did a couple of adjustments but the profile is pretty much dead on.

I tested the depth of my router set up on a waste piece of plywood and labelled the good depths. This was useful when I cut the other side. I just brought the router bit to the proper depth using the set up board. The second side went very quickly.

I now have the trailing edges of the centreboard shaped on both sides. I still have to do the leading edges but that will be faster because there is less material to remove. I measured it up and set up the fence. I'll cut tomorrow, I'm getting tired. It's easy to make mistakes when cutting. At least I find it easy to make mistakes.

Cutting the steps of the Scamp Centerboard was quick. I had a wee slip of the fence. The vibrations shook the clamp loose and the fence shifted. Not too much of a problem. I now need to smooth out the profile

It took a lot longer to shape the leading edge than I though it would. Finally I decided to shape just a small spot and gradually extend the good shape across the width. That worked well. I used the plane at first but I quickly changed to the sander with quite fine grit, 150. This went more slowly but gave better control. I would sand a bit, check the profile and adjust it. Eventually I got the edge shaped.

I used a rasp to rough in the transition between the top of the board and the shaped lower section. I finished by using the sander. The hardest part was getting the 2 sides the same. It really does not matter much but I would see it. Well I would not see it for long because the centreboard lives permanently attached inside its housing.

I got the leading and trailing edges shaped and relatively the same on both sides of the board.

The Scamp centreboard is now shaped. It's as accurate as I know how to make it. I rounded the bottom but not a great deal. My thinking is this, I bought a new rudder for the Tanzer and the bottom edge was almost blunt. The rudder is fabulous so it can't be all bad to have a quite blunt end. I also think that this centerboard might end up touching ground and I would prefer a surface that is thicker and stronger and not likely to get dinged.
The centreboard now needs to get some weight added and holes drilled for pivot, up and down hauls, and to have rope paths cut out. I need to source out some lead or iron plates. I've added iron bits in my Puddle duck racer daggerboard and it is not so difficult to do.

I posted a photo of the centreboard on the wooden boat forum and got a comment from John Welsford. He suggested more of a curve on the end of the centreboard.
He said that there was a theoretical advantage when sailing with the centreboard partly up. It makes sense, the bottom would then be the trailing edge so a larger radius and more shaping is useful.
I improvise some weights for the centerboard

Scamp plans specify that the centreboard and the rudder be weighted. Several people have melted lead or gotten lead sheets to fit into the centreboard. A few people have used iron/steel weights.
I've not had much luck locating lead sheet or iron bars in the area. I'm improvising, I'll get rid of some extra metal and get some weight at no cost. I had some ankle weights I used around the oars to help balance them better so they got commandeered as did a bag of lead balancing weights I had collected over the years of riding a bike. I added a handful of washers when I found I was short a pound or so. I spent some time getting the weights in the smallest possible space and dribbled some epoxy over the lot to stick it together so it could be handled.
There is not a lot of empty space in my weight cake and I'll add some extra weight to balance any air space that might be produced when I glue it in the cavity.
Now that I have a size I can rout out a cavity.

I used my router to cut out the cavity. The little wooden islands are left to support the router because the cavity is wider than the router base.
It took several passes at increasing depth to get the full cavity done. It took a lot longer than I thought it would take. Maybe I'm just slow.

The little tabs came off easily with the chisel. I also chiseled off the corners and a couple of rough spots. I then realized that I had made my hole 1/8 of an inch too small and I had to enlarge the cavity. I used a combination of chisel and to finish, the router.

The cavity is now complete. I'm ready to add the weights and close up the hole.
It was encouraging to see that there were no gaps in the centerboard and that the layers were solidly glued up. I plan to put some fiberglass cloth inside the cavity so that the weights do not create a weak spot. There will be cloth on the outside also. I don't expect any problems.


I'm making a thin plywood piece to put over the weight after I've glued and filled in the weight. I stuck a piece of plywood on a carrier board using 2 sided tape. Then I put it through the thickness planer. It's about 3 mm thick now and this will be perfect.
NOTE:In the end I did not use the thin ply. There was not enough space, some of the bolts had shifted and I had to grind a couple of spots flat. I had to flatten and fair the surface before glassing.
When I added weight to the puddle duck daggerboard, I just filled the cavity with thickened epoxy rather than putting a thin board and it took several coats of fairing to get the surface right. I think the thin board will be faster.
I didn't have enough epoxy to glue in the weights and fill the cavity completely so I worked on the mast and sanded for a few hours. Noah is delivering epoxy tomorrow they said.


Noah Marine delivered my order in less than 24 hours!! Happy Happy! I ordered East system epoxy rather than the MAS I'm used to. The East system is made in Canada and the price is about a third for what I was getting. Our dollar is not doing very well against the US dollar right now.
They claim to be non blushing, I'll report later after I've tried it.


I lined the cavity bottom and sides with a layer of glass cloth over thickened epoxy (wood flour) The filler was to correct a few dings I had made with the router. My weight plug had been glued very lightly and one chunk broke off. It shows the ankle weights that mostly make up the bottom layer.
I got creative and filled the gaps with a sloppy epoxy and sharp sand mixture. It weights quite a lot and flowed in quite well. The shop was quite cold so the mixture stayed runny for quite a long time and flowed well. It was the heaviest filler I could think of.
I could not think of a reason why sand would be bad. I guess time will tell if I made a mistake. A centreboard is a relatively simple thing to change if disaster strikes.


I stoked up the fire, put a sheet of wax paper and a flat plywood board on the insert and let the weights set.
It took about 7 hours to set so that it was almost solid. I scraped a bit that had flowed out but otherwise the operation seems a success. One little screw was sticking out so I took the grinder and brought him down. I'll need to fill some but not a huge amount. I expect the weight is about even within the thickness of the centerboard.
I had left some of the East System Epoxy mixing containers near the stove and they have set nicely. I have a couple of test spots on plywood I'll allow to sit for a few days to check for blush, otherwise the East System Epoxy seems perfectly usable. It is a bit runnier than the MAS and West I have used and soaked in the plywood really well. More observations later.

After filling any cavity, I set it aside to set with boards on top to keep it flat. After the epoxy had set, I checked it's weight. The centreboard is just a little under 40 pounds. This seems heavy to me but I'll make sure the lines and blocks/pivot are beefed-up and able to handle the weight.

I prepared a batch of fairing material and spread it on the centreboard. I'll need to sand/scrape this flush before I can add the fiberglass.
I've checked the epoxy samples and the mast for blush. It's been 2 days since I did them. So far not a trace of blush and the East epoxy has set very nicely and smoothly.


The epoxy set quickly to sanding hardness and I evened out the weight cavity. There is still a small dip wich got filled with 3M microbeads. I had some and will compare with the phonolic beads I used before and which sanded quite nicely.
After a quick sand I'll be ready to glass the centreboard but I'm not sure how to do this.
When I glassed the Puddle Duck Racer daggerboard I just use 2 small nails in the edge. My Scamp centreboard weights about 40 pounds so it's much harder to handle and support.

In the end I feared that I would have trouble handling the 40 pound centreboard as it dangled on 2 nails and there was a possibility that the nail or screw would pull out or bend. I decided to do each side separately. I taped the glass to the back after turning the corner smoothly. It took some time to set up but it actually fit nicely on the surface and sides. There is one spot that has a slight separation of glass and wood but it is at the top of the board and I think that can be fixed with no loss of strength after glassing.

The glass wet out nicely and there was no problems wetting out. I bought a slightly imperfect grade of glass. Noah had some and claimed it was fine except that it had slight imperfections and was not suitable for perfectly clear applications. I did not see any notable imperfection but after wetting out there was one thread that was still slightly opaque rather than perfectly clear. Maybe that's the problem. It is of no significance for my build since I plan to paint these parts anyway.

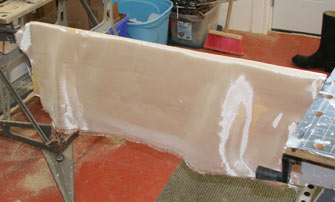
Here is the centerboard after the epoxy was spread on. The whitish spot is a bit of 3M microsphere I used to smooth a slight dip and is showing through the glass. The epoxy is on with no drips and has filled the glass. After this photo was taken I added a small amount of epoxy to better fill. The epoxy extends around to the underside and I will go later this evening and trim the glass and still slightly soft epoxy to make sure it is smooth.
If I had to do this centreboard again I would put the blank together except for the top layer of plywood and then glue up the last layer of the blank, and THEN shape the board. I did this for the rudder and it saved me lots of fairing and filling and fussing.
Lens distortion makes it look wonky but the shape is ok I think.
The new epoxy seems to be working just fine and so far no a trace of blush, it's setting well and seems to be behaving as expected.

I've glassed the second side of the scamp centreboard. I followed the same method as for the first side by stretching the glass cloth around the edges and taping it down. I expoxied the glass down and a bit on the other side. Here the epoxy has just set but is still just slightly soft. I cut the overlap with an utility knife and removed the extra glass.

After trimming the extra glass I pushed the still soft epoxy/glass down along the edge. The leading edge is perfect. It has 2 layers of glass and is smooth. The trailing edge, which was sharper is not as perfect and I have a couple of bubbles. After allowing the epoxy to set for a couple of days in my cold shop I was able to sand the bubbles off the edges and will recoat the trailing edge. It will be just fine. A quick sand overall and the centerboard is glassed and ready for a second coat of epoxy to fill the weave. All is well.
The centreboard is very close to spec and I'll start sorting out the case next. I had made the board first so as to make sure the case would fit properly. It is heavier than I expected and I think I will need a very sturdy system to raise it.
emails: Christine
This web site reflects my personal ideas and doesn't represent anyone else's point of view. I record the process I have followed and the result. I am not saying that it is the right or best way.
SCAMP envy/Lust This is a thread in the Wooden Boat Forum.
SCAMP capsize test Youtube Video.
Wikipedia Entry for SCAMP sailboat
Scamp sailing around in close quarters.
I find that a thickness planer is a really useful tool around the shop. I bought it when I felt rich but it's paid for itself by cleaning up less expensive wood.
Sadly my jig saw is no longer being made, it's at least 20 years old. I have a friend who uses a Dewalt jig saw and highly recommends them so here's a link. It has great reviews too.
I could not build without a random orbital sander. Mine is Makita but the DeWalt is good and cheaper
WaterProof Headlamp

Hooked on Wooden boats.com interview about SCAMP
Small Craft Advisor Scamp Forum
Detailed Blog of a Scamp Build from Small Craft Advisor Scamp Forum
I've added page on the tools you need to build a boat.
System 3 epoxy, this kit makes up 1 gallon total, not 2, it's a bit confusing. Good epoxy though.
West system epoxy, comes in many sizes too.
Total Boat epoxy
Fiberglass cloth. The more common weight for glassing small boats is 6 oz. Some kayaks used thinner glass.
If you decide to build a boat be careful. These tools can be dangerous. If you don't know how to safely handle something find out. There are lots of forums out there. I AM NOT AN EXPERT, THIS IS JUST A RECORD OF WHAT I HAVE DONE.